Battery switch on travel trailer function is crucial for managing your RV’s power. This guide dives into the hows and whys of these switches, covering different types, wiring, troubleshooting, and safety. We’ll explore how they integrate with your trailer’s electrical system, helping you understand power flow and potential problems. Get ready to become a battery switch expert!
We’ll cover everything from basic operation and understanding different switch types to advanced troubleshooting techniques using a multimeter. We’ll also delve into safety precautions, maintenance tips, and selection advice for choosing the right switch for your specific travel trailer setup. Whether you’re a seasoned RVer or a newbie, this guide will empower you to confidently manage your trailer’s power.
Understanding Battery Switch Functionality in Travel Trailers

Your travel trailer’s battery switch is a crucial component, acting as the central control for your trailer’s power. Understanding its function and operation is essential for safe and efficient use of your RV. This section will break down the different types, wiring, operation, and advantages/disadvantages of these switches.
Battery Switch Types in Travel Trailers
Travel trailers typically utilize one of two main types of battery switches: a simple on/off switch and a more sophisticated multi-position switch. The simple on/off switch is the most basic, offering only the ability to connect or disconnect the battery from the trailer’s electrical system. Multi-position switches, often featuring positions like “Off,” “Battery,” “Both,” and “Shore Power,” allow for more nuanced control, enabling you to select which power source (battery or shore power) feeds the trailer’s systems or to connect both simultaneously.
Some more advanced switches incorporate additional safety features like circuit breakers.
Typical Wiring Diagrams for Battery Switch Setups
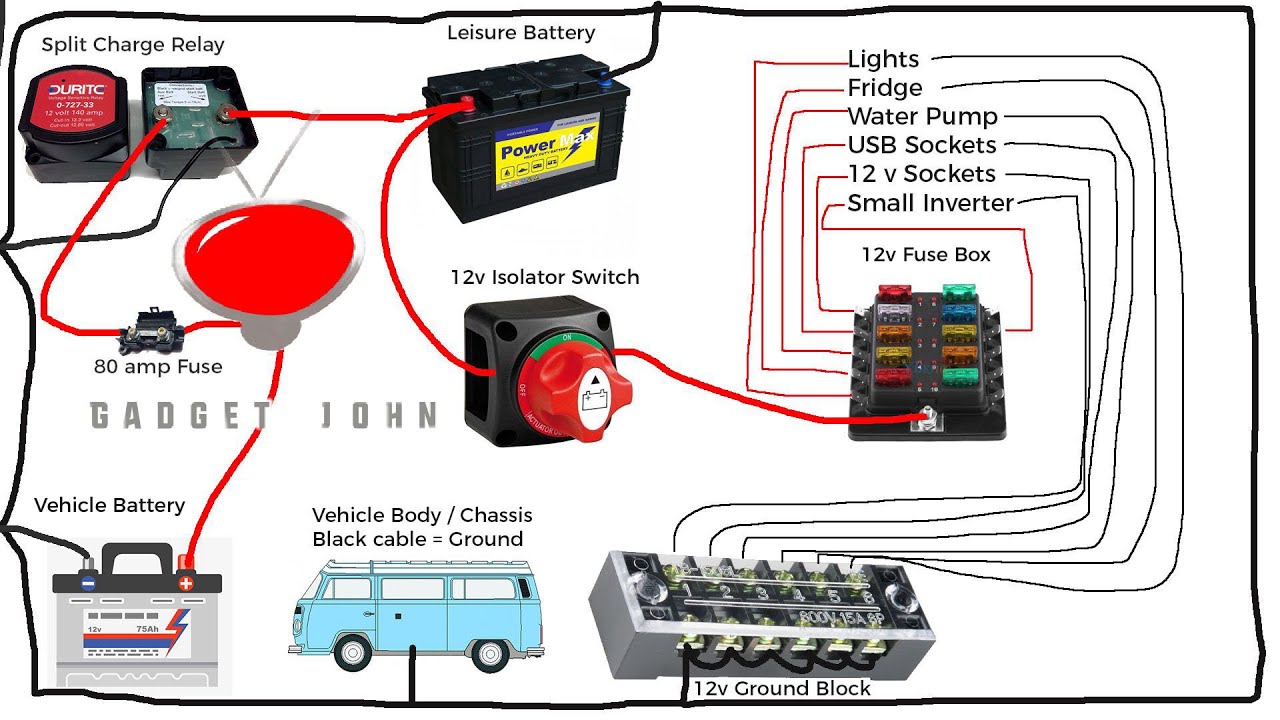
A standard battery switch setup involves a relatively straightforward wiring diagram. The battery’s positive (+) terminal connects to the input of the battery switch. The output of the switch then connects to the positive bus bar (a central distribution point) that feeds power to the trailer’s various electrical components. The negative (-) terminal of the battery usually connects directly to the trailer’s chassis, providing a ground.
More complex setups might include multiple batteries, a solar panel charging system, or an inverter, adding more wiring complexity but generally following the same basic principles of connecting to the switch and then distributing power. A schematic diagram would show the battery, the switch, the bus bar, and the various circuits branching off the bus bar, with clear labeling of positive and negative connections.
For example, a simple diagram would show a straight line from the battery’s positive terminal to the switch’s input, then another line from the switch’s output to the bus bar.
Operating a Battery Switch: A Step-by-Step Guide
Operating a battery switch is generally straightforward, but safety precautions are paramount. Always ensure the switch is in the “Off” position before performing any maintenance or connections. To operate a simple on/off switch, simply flip the switch to the “On” position to connect the battery to the trailer’s system. To disconnect, flip the switch to the “Off” position. For multi-position switches, familiarize yourself with the switch’s markings (usually clearly labeled) before operating it.
For instance, to run solely on battery power, select the “Battery” position; to use shore power, select the “Shore Power” position. The “Both” position should only be used cautiously, ensuring your system can handle the combined load. The “Off” position completely disconnects the battery.
Advantages and Disadvantages of Different Battery Switch Types
Simple on/off switches are inexpensive and easy to understand and operate. However, they lack the flexibility of multi-position switches. Multi-position switches offer greater control and the ability to manage multiple power sources, but they are typically more expensive and may be slightly more complex to understand. For example, a simple on/off switch is sufficient for a basic trailer with limited electrical needs, while a multi-position switch is more suitable for trailers with numerous appliances and a solar panel setup, allowing for optimized power management and preventing battery drain.
The increased complexity of multi-position switches might also pose a slight learning curve for some users.
Troubleshooting Common Battery Switch Issues
Your travel trailer’s battery switch is a critical component, controlling power flow to your house batteries and ensuring a smooth camping experience. Problems with this switch can leave you stranded without power, so understanding how to troubleshoot them is essential. This section will guide you through identifying common issues and resolving them.
So, you’re an audiophile who travels? Awesome! Check out this guide on setting up an amazing audiophile travel setup to make sure your ears are happy on the go. It’s all about packing smart and prioritizing sound quality, even in less-than-ideal listening environments. And while you’re planning your trip, don’t forget to sort out your insurance! Getting Aon travel insurance beforehand is a smart move; you’ll have peace of mind knowing you’re covered for unexpected issues.
Common Battery Switch Problems
Several issues can arise with your travel trailer’s battery switch. These range from simple connection problems to more serious internal failures within the switch itself. Understanding these potential problems allows for quicker diagnosis and repair. Common problems include a switch that fails to turn on, intermittent power, corrosion on terminals leading to poor connections, and internal switch failure resulting in a completely dead circuit.
So, you’re an audiophile who travels? Awesome! Check out this guide on setting up an amazing audiophile travel setup to ensure your listening experience remains top-notch wherever you go. It’s crucial to protect your investment, though, so remember to get travel insurance. Before you jet off, look into Aon travel insurance options; they often have great coverage for expensive equipment.
Planning ahead makes all the difference for a smooth and enjoyable trip!
Loose or corroded connections are often the easiest to fix, while internal failures may require replacement of the entire switch.
Troubleshooting a Battery Switch That Doesn’t Turn On
If your battery switch won’t turn on, systematically check several areas. First, visually inspect the switch itself for any obvious damage, loose connections, or signs of corrosion. Clean any corrosion you find with a wire brush and baking soda solution. Next, ensure the switch is properly wired and that all connections are tight and secure. A loose wire or a corroded terminal can prevent the switch from functioning.
If the problem persists, you may need to check the circuit breaker or fuse that protects the battery switch circuit. A tripped breaker or blown fuse will prevent power from reaching the switch. Finally, consider the possibility of a faulty switch requiring replacement.
Diagnosing a Faulty Battery Switch with a Multimeter
A multimeter is an invaluable tool for diagnosing electrical problems, including a non-functional battery switch. Before you begin, always disconnect the negative terminal of your battery to prevent accidental shocks. To check the switch itself, set your multimeter to the continuity setting. Place the probes on the input terminals of the switch; a continuous tone indicates a closed circuit.
If there’s no continuity, the switch is likely faulty. Similarly, check continuity between the input and output terminals when the switch is in the “on” position. Lack of continuity suggests a problem within the switch mechanism. You can also check the voltage at the input and output terminals of the switch with the multimeter set to the voltage setting.
If the input voltage is present but the output voltage is absent, this further confirms a faulty switch. Remember to consult your specific multimeter’s instructions for proper usage.
Troubleshooting Flowchart
The following flowchart visually Artikels the troubleshooting steps for a non-functional battery switch:
Start --> Inspect switch for damage/corrosion --> Clean if necessary --> Check all connections --> Are connections secure? --> Yes --> Check circuit breaker/fuse --> Is it tripped/blown? --> Yes --> Reset/replace --> Does switch work? --> Yes --> End --> No --> Replace switch --> End --> No --> Test switch with multimeter --> Is switch faulty? --> Yes --> Replace switch --> End --> No --> Check battery voltage --> Is battery charged?--> Yes --> Problem elsewhere in the circuit --> End --> No --> Charge battery --> End
Safety Precautions and Best Practices
Working with your travel trailer’s electrical system, including the battery switch, requires caution. Improper handling can lead to serious injury from electrical shock or burns, or damage to your RV’s electrical components. Always prioritize safety when performing any maintenance or repairs.
Before you begin any work on your travel trailer’s battery switch, ensure the power is completely disconnected. This means turning off any breakers or switches related to the battery system, and physically disconnecting the battery’s negative terminal (ground). Remember, even with the switch off, residual power might still be present in some parts of the system.
Necessary Tools and Equipment
Proper tools are essential for safe and efficient battery switch maintenance or replacement. Having the right equipment on hand will prevent delays and ensure a smooth process. A lack of appropriate tools can lead to unnecessary risks and potential damage.
- Wrench(es): Appropriate sizes to fit your battery terminals and the battery switch mounting bolts.
- Screwdrivers: Phillips and flathead, in various sizes, depending on your battery switch and RV construction.
- Wire cutters/strippers: For any wire modifications or repairs (if needed).
- Voltmeter: To verify the power is completely disconnected and to test battery voltage.
- Safety glasses: Protect your eyes from sparks or accidental splashes.
- Gloves: Insulated gloves are highly recommended to protect against electrical shocks.
- Battery terminal cleaner: To ensure clean connections for optimal performance.
Battery Switch Maintenance Best Practices
Regular maintenance extends the life of your battery switch and ensures reliable operation. Neglecting maintenance can lead to premature failure, potentially stranding you on a trip.
Regularly inspect the switch for corrosion, loose connections, or damage. Clean the terminals with a battery terminal cleaner and a wire brush to remove any corrosion build-up. Tighten any loose connections. Consider applying a dielectric grease to the terminals to prevent future corrosion. If you notice any signs of damage or malfunction, address them promptly.
Replacing the switch proactively is better than dealing with a sudden failure.
Disconnecting and Reconnecting the Battery Switch, Battery switch on travel trailer function
Proper disconnection and reconnection procedures are crucial for safety and to avoid damaging your electrical system. Always follow a systematic approach.
- Turn off all electrical appliances and devices within the RV.
- Turn off the main battery switch to the OFF position.
- Disconnect the negative (-) battery terminal first using the appropriate wrench. This minimizes the risk of accidental short circuits.
- Perform your maintenance or repairs.
- Reconnect the negative (-) battery terminal.
- Turn the main battery switch to the ON position.
- Verify the proper functioning of all electrical appliances and devices.
Visual Representation of Battery Switch Operation
Understanding how a battery switch works is easier with a visual aid. This section will break down the physical components and their interactions, helping you grasp the electrical flow and the switch’s “on” and “off” states.A typical battery switch, often found in travel trailers, manages the power flow between two batteries (typically a house battery and a vehicle battery) and the trailer’s electrical system.
It’s essentially a multi-position switch, allowing you to select which battery or combination of batteries powers the trailer’s appliances and lights. Let’s explore the internal workings.
Battery Switch Components and Their Functions
The switch itself houses several key components. There are input terminals for connecting the positive (+) and negative (-) leads from each battery. These are usually clearly labeled, such as “Battery 1,” “Battery 2,” and often have large, robust connectors to handle the current. Then there are output terminals, usually labeled “Load,” which connect to the trailer’s electrical system.
Internal to the switch are robust electrical contacts, often made of copper or a similar conductive material. These contacts are moved by the switch handle to establish or break the connections between the batteries and the load. Some switches also incorporate a fuse or circuit breaker for additional protection. More sophisticated switches might include relays to handle higher currents or provide additional control functions.
Battery Switch in “On” and “Off” Positions
Imagine a simple two-battery switch. In the “Off” position, all internal contacts are disconnected. No electrical current flows from either battery to the load. The switch handle would be in a neutral position, with no direct connection established. Visually, you would see no obvious electrical connections between the input (battery) terminals and the output (load) terminals.In the “Battery 1 On” position, the switch internally connects the positive and negative terminals of Battery 1 to the positive and negative load terminals, respectively.
Current can now flow from Battery 1 to power the trailer’s systems. Visually, you’d see a path of connection from Battery 1, through the switch’s internal contacts, and directly to the load terminals.Similarly, in the “Battery 2 On” position, Battery 2 is connected to the load. In a “Both Batteries On” position (if available), both batteries are connected in parallel to the load, effectively doubling the available power.
In this configuration, you would see electrical paths from both Battery 1 and Battery 2 simultaneously connected to the load terminals through the internal contacts of the switch.
Diagram of Electricity Flow Through the Switch
Imagine a simple diagram. Two circles represent Battery 1 and Battery 2, each with positive (+) and negative (-) terminals. Lines represent wires. A rectangular box represents the battery switch with input terminals (Battery 1 +, Battery 1 -, Battery 2 +, Battery 2 -) and output terminals (Load +, Load -). In the “Battery 1 On” position, a solid line connects Battery 1’s positive terminal to the Load +, and another connects Battery 1’s negative terminal to the Load -.
All other connections are visually represented as disconnected. The “Battery 2 On” and “Both Batteries On” positions would show similar connections, reflecting the appropriate electrical paths. The diagram visually reinforces the concept of how the switch directs the flow of electricity.
Mastering your travel trailer’s battery switch is key to a smooth and safe RVing experience. By understanding its function, troubleshooting common issues, and practicing safe handling, you can ensure reliable power for all your onboard systems. Remember to consult your owner’s manual and, if unsure about any electrical work, seek professional assistance. Happy travels!
Q&A: Battery Switch On Travel Trailer Function
What happens if my battery switch is left in the “off” position?
Leaving the switch off completely disconnects the house batteries from the trailer’s electrical system. This prevents battery drain but also means no power to appliances or lights.
Can I use a different type of battery switch than what came with my trailer?
Potentially, but ensure the replacement switch has the correct amperage rating and terminal configuration to match your trailer’s electrical system. Incorrect sizing can lead to overheating or failure.
How often should I inspect my battery switch?
Regularly inspect your battery switch for corrosion on terminals and loose connections. A visual check every few months is recommended, especially before and after extended storage.
My battery switch is making a clicking sound. What’s wrong?
A clicking sound often indicates a problem with the switch itself, possibly a faulty relay or low battery voltage. Check your battery voltage and consider replacing the switch if the problem persists.
